Saturday, May 24, 2025

Playtesting an Italo-Turkish war battle from 1911

Shawn, author of Great War Spearhead, recently sent me a draft scenario for the battle of Sciara-Sciat, a battle in the Italo-Turkish War of 1911. It is a small action by Great War Spearhead standards, but potentially one of some interest, taking place in 1911 when the level of technological sophistication has not yet ramped up as it did from 1915.

The map below (from the Wikipedia page) shows the larger picture. The scenario takes place on the right hand side of the map, in an area that the map denotes as 'oasis'.  Therein lies a significant decision in the scenario design: how to treat this vegetation. Shawn recommends that it be treated as limiting visibility to 6", and also therefore direct fire range. The Italians, on the defensive, have some naval gunfire support, and therein lies a second significant decision: the ease with which that NGS is obtained, and how far onto the battlefield it can exert influence.


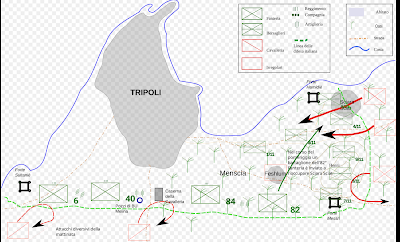
Source: https://en.wikipedia.org/wiki/Battle_and_massacre_at_Shar_al-Shatt#/media/File:Sciara-1911.svg

Jon and played this small scenario twice in the evening, the second play test involving different answers to those two key questions. In the first we assumed that the oasis area not only limited visibility and ranges, but also offered 'soft cover', i.e. it offered some limited protective value when taking fire. We also went with Shawn's recommendation on NGFS, it only be available once Italian stands had come under attack, and then requiring a die roll of a '6' to call it in. The scenario was played using my 6mm WW1 armies, all from Irregular figures.


Shawn's scenario map. Most of the photos are taken looking from the left edge of the map across the table/battlefield


The view from behind the Italian lines. Tripoli would be a the lower left off the table.

Italian defences, facing south, part of the defensive lines around Tripoli

Villagers from Sciara Sciat (proxied by ANZAC's.. sorry) go into immediate attack of the nearest Italians, a company occupying a degraded fort.

Similarly villagers attack the Italian defensive line from the rear

The vilagers destroy the Italian defenders of the fort

Meanwhile the Turkish and Arab troops sweep forward. From the camera view, Arab infantry on the left, dismounted Arab cavalry in the centre, and a Turkish regiment on the right


The Italian centre comes under attack

Villagers eliminate several companies of Italian defenders after attacking them from the rear.


The outcome we pretty decisive. The Italians were well and truly defeated.
We then tried a second run through, this time with the oasis not offering any defensive value (although still limiting visibility and direct fore ranges. We also allowed the NGFS to be available as soon as the Italians were attacked.

The NGFS was immediately devastating on the Arab infantry nearest the coastline (and the only unit that was vulnerable because of visibility limitations

The Italians defeated the villagers quite decisively this time (the result of die rolling), and were able to turn to face the advancing Turkish infantry. The fire fight did not start well for the Italians however, the Italian MMG company, and attendant infantry company, are suppressed

The Italian Bersagliari regiment that was deployed forward defending the forts executed a 'Break Off' move and withdrew two turns. This saved the unit from being overrun and eliminated. It also bought time for the Italian reserves to enter the battle.

The attacking Arab troops had suffered badly from the NGFS


 The second trial with its altered assumptions meant that the scenario was more of a 'game'. The Italians were still pushed from their position, but it was more of a fight. We'll be interested to see how Shawn evolves the scenario, given our play tests and feedback.

Thanks Shawn.

Sunday, May 18, 2025

Victorian Science Fiction action with HotT

To finish off a week of HotT games, Jim and I played a Big battle HotT game. Jim was keen to see how BBHotT played when compared with our first foray into the new DBF rules. We chose my two 20mm VSF armies - British and Turkish. Of note was my choice of a God ... that never showed up. We also both included an aerial hero in our multitudes, along with a solid core of blade supported by shooters and artillery. In HotT terms, we fielded the standard three x 24 point commands. In DBF terms, the British army totalled 194 points, the Turkish 192. Both armies included a solid core of Riders, the British also including a number of knights to the Turkish single knight base.

This isn't an AAR, so it's short on detail of composition and detail of the action. The report is more simply intended as a visual record.


British riders moving forward towards an old industrial complex

British behemoths

British aerial hero supported by two flyers

The Turkish army also included the same detachment .. aerial hero supported by two flyers (men on flying carpets, of course)


The first major clash came on the Turkish left


The Turkish right, a behemoth supported by riders and shooters


The centre became very messy very quickly once action was joined


That doesn't look good for the unit of Turkish lancers/knights that has become isolated


The two airboats went head to head.. quite a jostle

The action was fairly balanced, until my own die rolling turned to disaster, and in two turns I lost the CnC and the general of the left flank command, and quite a few fighting stands, including the artillery and several riders. That's the way it goes. We now plan to use the same armies in a DBF game some time soon. Life has got in the way over the next week, so it will be a little while.

Regardless of the dice though, HotT games are always a lot of fun... and it was good to see the larger Big Battle armies arrayed on the table.


War of the Triple Alliance

This week's 15mm Volley and Bayonet outing was an 1866 battle from the War of the Triple Alliance in South America. As usual, not a full...